 In part 2 of my article on using Virtual Instruments, I’ll have a closer look at some of the aspects of orchestral VI plugins and also provide some musical examples of the sounds I’m using in my compositions that demonstrate the features I’m talking about.
In recent years the quality of orchestral VIs has increased dramatically. There are now a wide assortment of companies offering full-orchestra VIs as well as solo versions of specific instruments in the orchestra such as Violin, Cello, Flute, Trumpet, Piano, etc. Depending on your needs you may need one or both options. For much of the music I was working on, I needed that full-orchestra sound that I’d heard in my head that I could never achieve with the plugins that were pre-bundled with my DAW software. Some of my cheaper plugins approached the quality I needed but still had major holes in the orchestra. I had decent string sounds but no woodwinds other than flutes and a few saxes, no brass unless I only wanted salsa-trumpet sounds and basic fake-sounding trombones, and nothing in the way of harps sounds. After getting East West Quantum Leap Symphonic Orchestra, I was kicking myself for not getting it sooner.
Tip #5: Use your VI plugins as a tool to learn arranging techniques
One of the side benefits to having a high-quality orchestral VI plugin is that they can be a great educational tool for arranging/composing for various instruments that you wouldn’t otherwise have access to. There’s no better teacher than your own ears for learning what can work in an arrangement when you have access to the right sounds to demo your ideas. Imagine having a full orchestra at your disposal, anytime day or night, to play your arrangements, no matter how badly they might suck, as you experiment with different groups of instruments. Through the magic of midi you can demo various instruments playing against each other, swapping out parts with different instruments of the orchestra, editing the voicing of your harmony, previewing options along the way, and improve your ability to “play the orchestra” as you become more accustomed to the most effective ways to use the different sounds in each section. This alone is well worth the price of buying a decent orchestral VI. As a matter of fact, after getting mine I’ve found myself listening to more orchestral music to get better ideas for arranging music for the different sections of the orchestra. (this makes my wife happy on long road trips when we have to agree on music).
Tip #6: When shopping for an orchestral VI, read the product information online to understand how the instrument sounds were sampled, which specific instruments are contained in the library, and any features to create ambiance with the plugin, such as as mic-placement controls and reverb options.
When I first started auditioning the various sounds from the East West Quantumm Leap Symphonic Orchestra plugin online I was floored! It provided that big Hollywood-movie-orchestra kind of sound that I’d heard on so many movie scores. As I read more about the company and how their orchestral libraries were captured I discovered some impressive facts:
- The orchestral library took several years of recording and post-production to create the samples (this explains their strict licensing scheme requiring an i-Lock USB key)
- They recorded the sounds in some of the most famous critically acclaimed concert halls across the world using grammy-award-winning engineers and producers who had years of experience recording orchestras. This explains why it sounds the way it does: big, spacious, warm tones, lots of detail, as if you’re in the middle of a gigantic orchestra. A huge amount of work went into creating this library and you can tell by the way it sounds.
- The instruments were recorded in various locations within the concert hall: from the conductors stand, up close, using various types of room mics, etc. These different mic placements are available in the Platinum version of the library and can be controlled from the plugin (adjusting the amount of up-close versus room sound you want). The VI also comes with its own convolution reverb to add even more ambiance to the orchestra if needed. All of this makes it easier to create a big spacious sound, which is why we want an orchestral library in the first place.
The level of detail and attention paid to the way the instruments sound is what finally sold me on this plugin. I can’t imagine how much work it would have been to sample all of these instruments in a variety of ranges and articulations, EQ and balance all of the various recorded samples, and pull all them into a single plugin that is easy to work with. I have no regrets about buying this one, it was worth every penny.
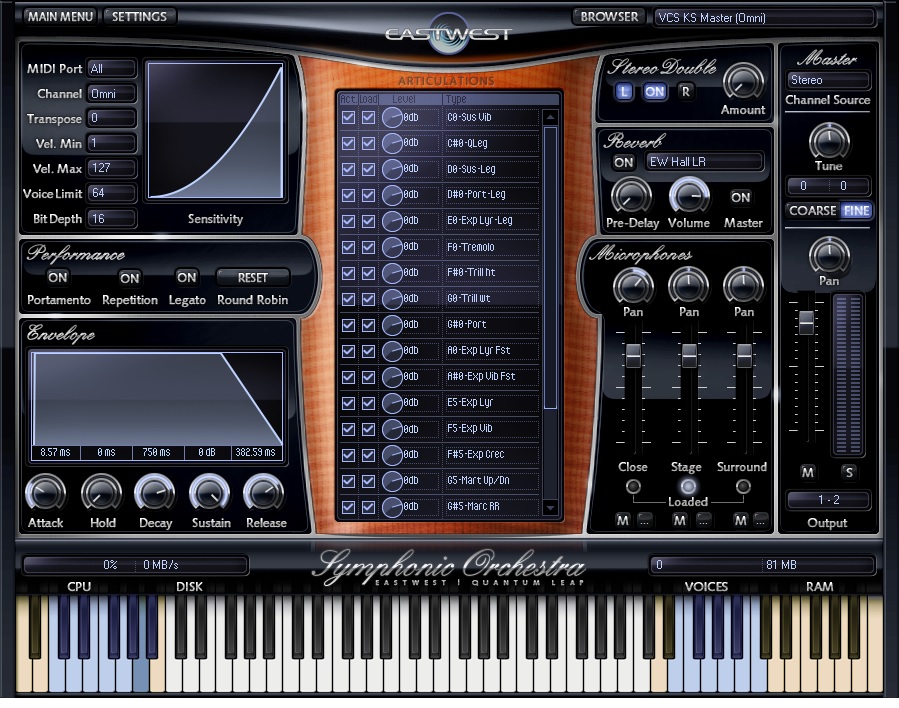
EWQL Symphonic Orchestra – Interface
Tip #7: To get the most realistic sounds out of your orchestral plugins, spend the time to explore all of the articulations available for each instrument sound
One of the better aspects of this plugin is that they sample the strings, horns, and woodwinds with various “articulations” common to each instrument and make them easy to find and use. Articulations are the different ways a given instrument can be played to make different sounds. For example, a violin can be bowed in a number of different ways (long and short bow, tremolo, bowed close to the bridge, plucked). All of these different ways of playing the violin create a unique sound and bring out different tonalities of the instrument. For a realistic orchestral library you want to have all of these various articulations available to use so that you can express all of the same techniques that a real string player, brass, or wood-wind player will use for different phrases in a piece of music.
The various articulations are sampled separately so that all of the right overtones are captured when the instrument is played in a specific way. For this VI plugin the articulations are controlled by hitting a separate midi note (out of range of your selected instrument patch) mapped to a specific articulation you want to use, while playing a separate note for the actual pitch you want to sound. In this way you can specify the pitch, velocity, duration, and articulation all from your midi keyboard. They call this “key switching”. In the screenshot above you can see the key-switches for the articulations (blue keys) and the range of available notes (white keys) for the cellos. When playing a part you simply hit the blue keys (mapped to the articulation you want) while playing the other keys non-blue keys for the part you want to play. For me it’s easier to record the actual notes of a part on a first pass, then go back later and specify the articulations for each note (in the piano roll editor) and tweak as needed to get the articulations that suit the type of part I’ve played. Note: most of the high-quality orchestral VIs will require a significant amount of disc space to install the sample library due to the amount of samples needed for all of these different articulations of each instrument. You will use them!!
I made good use of the EWQL Symphonic Orchestra plugin for my song “Invasion of Mayberry”. Prior to having this VI plugin I first recorded the song with a cheaper assortment of VIs that didn’t contain some of the more useful articulations for horns and strings, such as trombone swells, spiccato and tremolo strings, staccato and sustained piccolos, trills and falls for various instruments, string clusters, horn clusters, etc.
For this track, I was going for a 60’s comedy-sci-fi movie kind of vibe. I spent a lot of time listening to music from different shows of that era including The Twilight Zone, The Ghost and Mr. Chicken, Get Smart, and It Came From Outer Space, to name a few. From this I came up with some ideas for the type of articulations to use in the orchestra parts to bring out the vibe I was going for (quirky, mysterious, retro, spy theme). Here are some of the specific articulations I used:
- “rips” from the piccolos
- swells and flutter tonguing from the trombones
- plucked and spiccato sounds from the cellos
I couldn’t believe what a difference it made to spend the time exploring all of these options to make these parts fit the vibe of the song that I was going for. I’m glad that I saved my original version of this song since it provides a good before-versus-after comparison of the same song recorded with two different plugins.
Here is before-version of the track using my old VI plugins with few options for articulations to use to make the orchestral parts more life-like:
Now here is the same track after I re-orchestrated my parts with the EWQL Symphonic Orchestra plugin, and spent the time explore and edit the different articulations for each part.
You can hear how the trombone swells and flutter-tonging parts worked much better on the intro especially, as well as the more realistic piccolos “rips”, and plucked cellos. You can hear the “tremolo” cellos at 1:22 which added more tension to this part of the song as it blasts-off into the final chorus. I also used the trombone swells at the very end to give a more mysterious and dramatic end to that minor/major7 (a.k.a. “James Bond”) chord. I also liked the sound of the xylophone much better overall in the EWQL Symphonic Orchestra plugin compared to my old plugin. I can hear much more detail in the instrument, even the sound of the mallets hitting the keys, making the part work much better with the piccolos (who are doubling those xylophone accents) to give that 60s kind of I Dream of Genie theme sound that was used so much in TV and movie music of that period. None of this would have been possible with my cheaper plugins, and the new sounds made the song work much better, at least to my ears.
In part III of this article I’ll talk about using VIs for funky horn parts, have a look at features for “humanizing” parts, and and lastly, I’ll discuss system-performance considerations when using VIs in your recording setup. Until then, happy music making!